Friday, 25 September 2015

Week 3 Fyp 2

List of activity
Study about wifi shield cc3000 control relay

Objective
Learn about wifi shield operation

Content

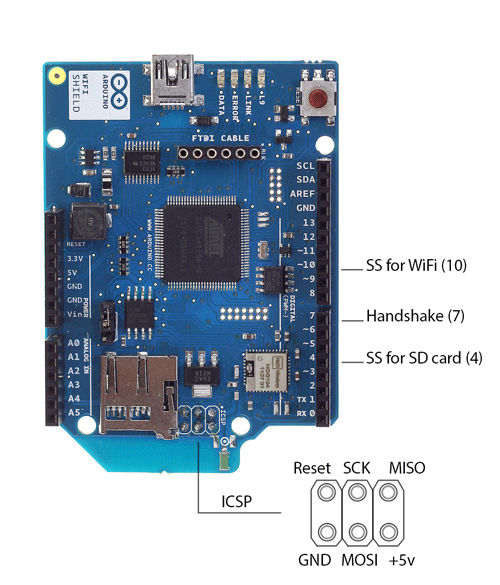
The Arduino WiFi shield allows an Arduino board to connect to the internet using the WiFi library and to read and write an SD card using the SD library.The WiFi Library is included with the most recent version of the Arduino IDE. The firmware for the WiFi shield has changed in Arduino IDE 1.0.4. This WiFi Shield makes DIY home automation much more affordable. Nothing else on the market is this cheap and this simple to use and configure.This Shield is for use with any 5V or 3.3V micro that has a serial connection. As constructed here it is plug compatible with the standard Arduino boards. 

Connecting the Shield

To use the shield, mount it on top of an Arduino board ("In my project i use Arduino Mega 2560 board").Digital pin 7 is used as a handshake pin between the WiFi shield and the Arduino, and should not be used.

Saturday, 19 September 2015

Week 2 FYP2

List of activity

Test wifi shield

Objective

Learn how to set up web server using arduino wifishield cc3000

Content

In this week i have learn how to set up a web server by using wifishield cc3000. For my project this is important part. This process will allow user  to control a electrical appliances wirelessly. 

This is shows how to set up an Arduino with wifishield as a web server. The web servers in this are used to serve up web pages that can be accessed from a web browser running on any computer connected to the same network as the Arduino.

Some of the Arduino web server pages allow access to the Arduino hardware – this allows hardware to be controlled (e.g. switching on and off an LED from the web page) and monitored (e.g. reading the state of a switch and displaying it on a web page).
Hardware Components
The hardware required for following this series of tutorials is:
·                     An Arduino board
·                     An Arduino wifi shield module cc3000
·                     A USB cable for powering and programming the Arduino
·                     A computer with a micro SD card slot or a card reader with a micro SD card slot – only required for SD card servers

Hardware Setup
Before starting:
           
1.             Download libary for arduino cc3000
2.            Plug wifi shield on arduino. For my project i use arduino atmega 2560
3.            Test the SD card in the wifi shield.  

Saturday, 12 September 2015

Week 1 FYP 2

List of activity

Went to Jalan Pasar

Objective

Buy a component

Content
In this week i went to Jalan Pasar Pudu and bought some electronics equipment that may be used for my project and it coses me almost araund rm300. The componet that i bought is Arduino Mega 2560,wifi shield cc3000, relay 5Vdc,transistor 2n222a,resistor 330, dc jack, terminal block and other For first, the microcontroler i used is the arduino uno. After that there have some problem which is, the memory does not enough with my code. To overcome this problem i need change the microcontroller board. After make some research i decide to use Arrduino Mega 2560. This because arduino mega 2560 provide a large memory compare than arduino uno. Picture below shows some component that i have buy.